Editor - Snapshot Part
The snapshot part is the core of the GVE edition and implements the snapshot model.
Although the model is simple, the UI provides a lot of editing functions on top of it, grouped in 3 main sections:
- text tab: base text.
- operations tab: operations applied to the base text.
- snapshot rendition: visual rendition of the snapshot.
Typically, you fill this part as follows:
- enter a base text. This is the text you start from. This usually is done only once as the very first task.
- enter as many operations as required to describe all the alterations of this text, one after another. Usually, you want also to encode the corresponding visual layer, by adding more features to each operation.
- whenever you add operations, you can check their output by running them and looking at the resulting texts and at the snapshot rendition.
Text Tab
Text Tab - Base Text
The text tab contains the collapsible base text section, where you enter the base text, usually just once. So, this is usually collapsed to give more room to the UI.
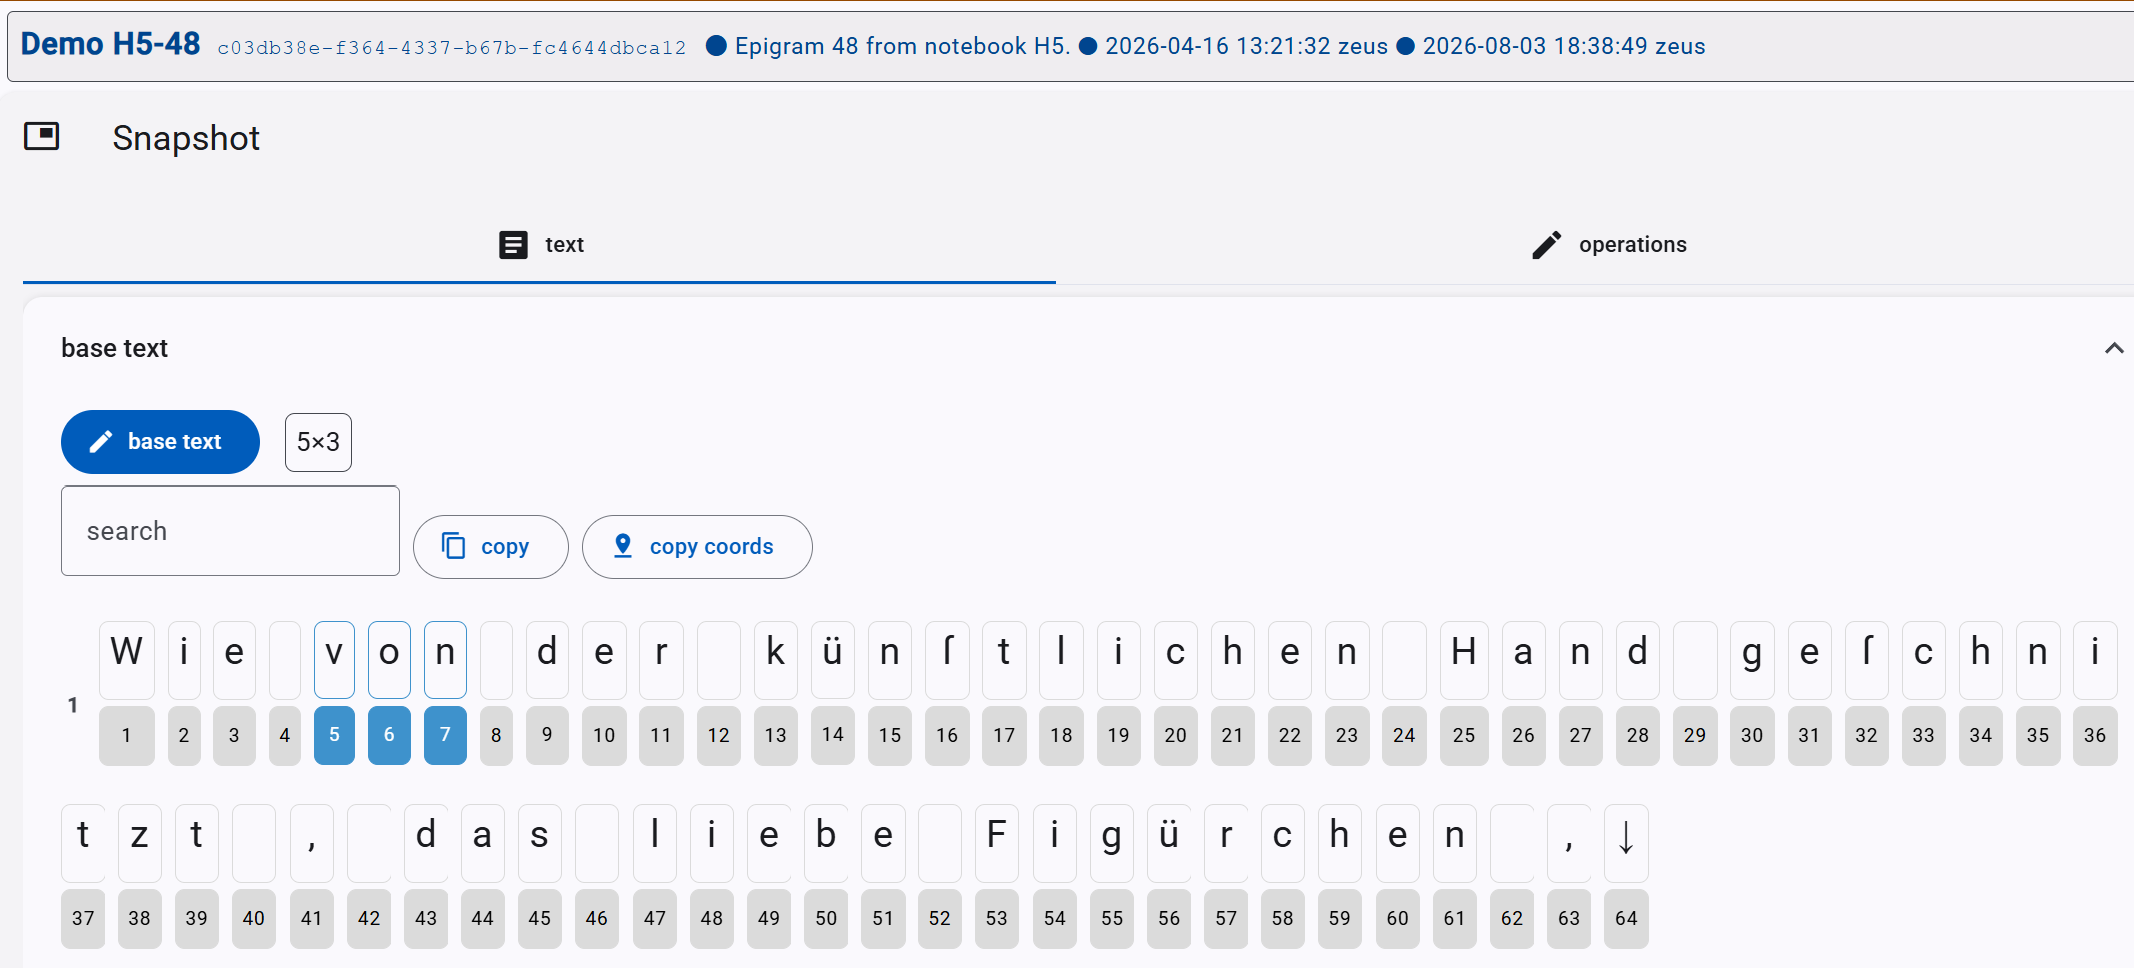
When you create a new snapshot, the first thing you must do is setting the base text by clicking the base text button in this section and then typing or pasting it in the popup.
⚠️ WARNING: setting the base text has the effect of clearing all the operations! This is required, because all operations depend on it, and become meaningless once you change the base text. If you happen to find out that your base text needs some changes after you have entered operations, you can anyway copy them (with the Copy DSL operations button) and paste them back later (with the Add operations batch button); you will then have to adjust their coordinates according to your changes.
Once you set the base text, this gets displayed here character by character:
- each character gets a numeric ID (starting from 1) which uniquely identifies it within this snapshot. Numeric IDs are never reused: once an ID is assigned, is stays assigned to that specific character forever (in the context of this snapshot), even if an operation deletes them. The ID is displayed below each character.
- alternatively, you can display the 0-based index of each character in its text: use the
#button to toggle this mode. This is used when you must refer to a specific sequence of character and their IDs are not consecutive. - the end of each line is explicitly marked by a line-feed character (LF, represented with a down arrow). After this, the next line is displayed below the previous one. Each line is numbered for your convenience, starting from 1.
- you can type text in the search box to highlight all the matches in the displayed text.
- you can click a character to select it. Once this is done, you can Ctrl+click another character to select the whole span of characters from the first to the last clicked. In both cases, the current selection is displayed next to the search box, like
7x3, where7is the ID of the first selected character and3is the length of the selected text span. - the copy button allows you to copy the selected text.
- the copy coords button allows you to copy the coordinates of the selected text.
Text Tab - Result
The result section contains all text alterations resulting from operations. Every operation gets an input text, and transforms or annotates it in some way, producing an output text.
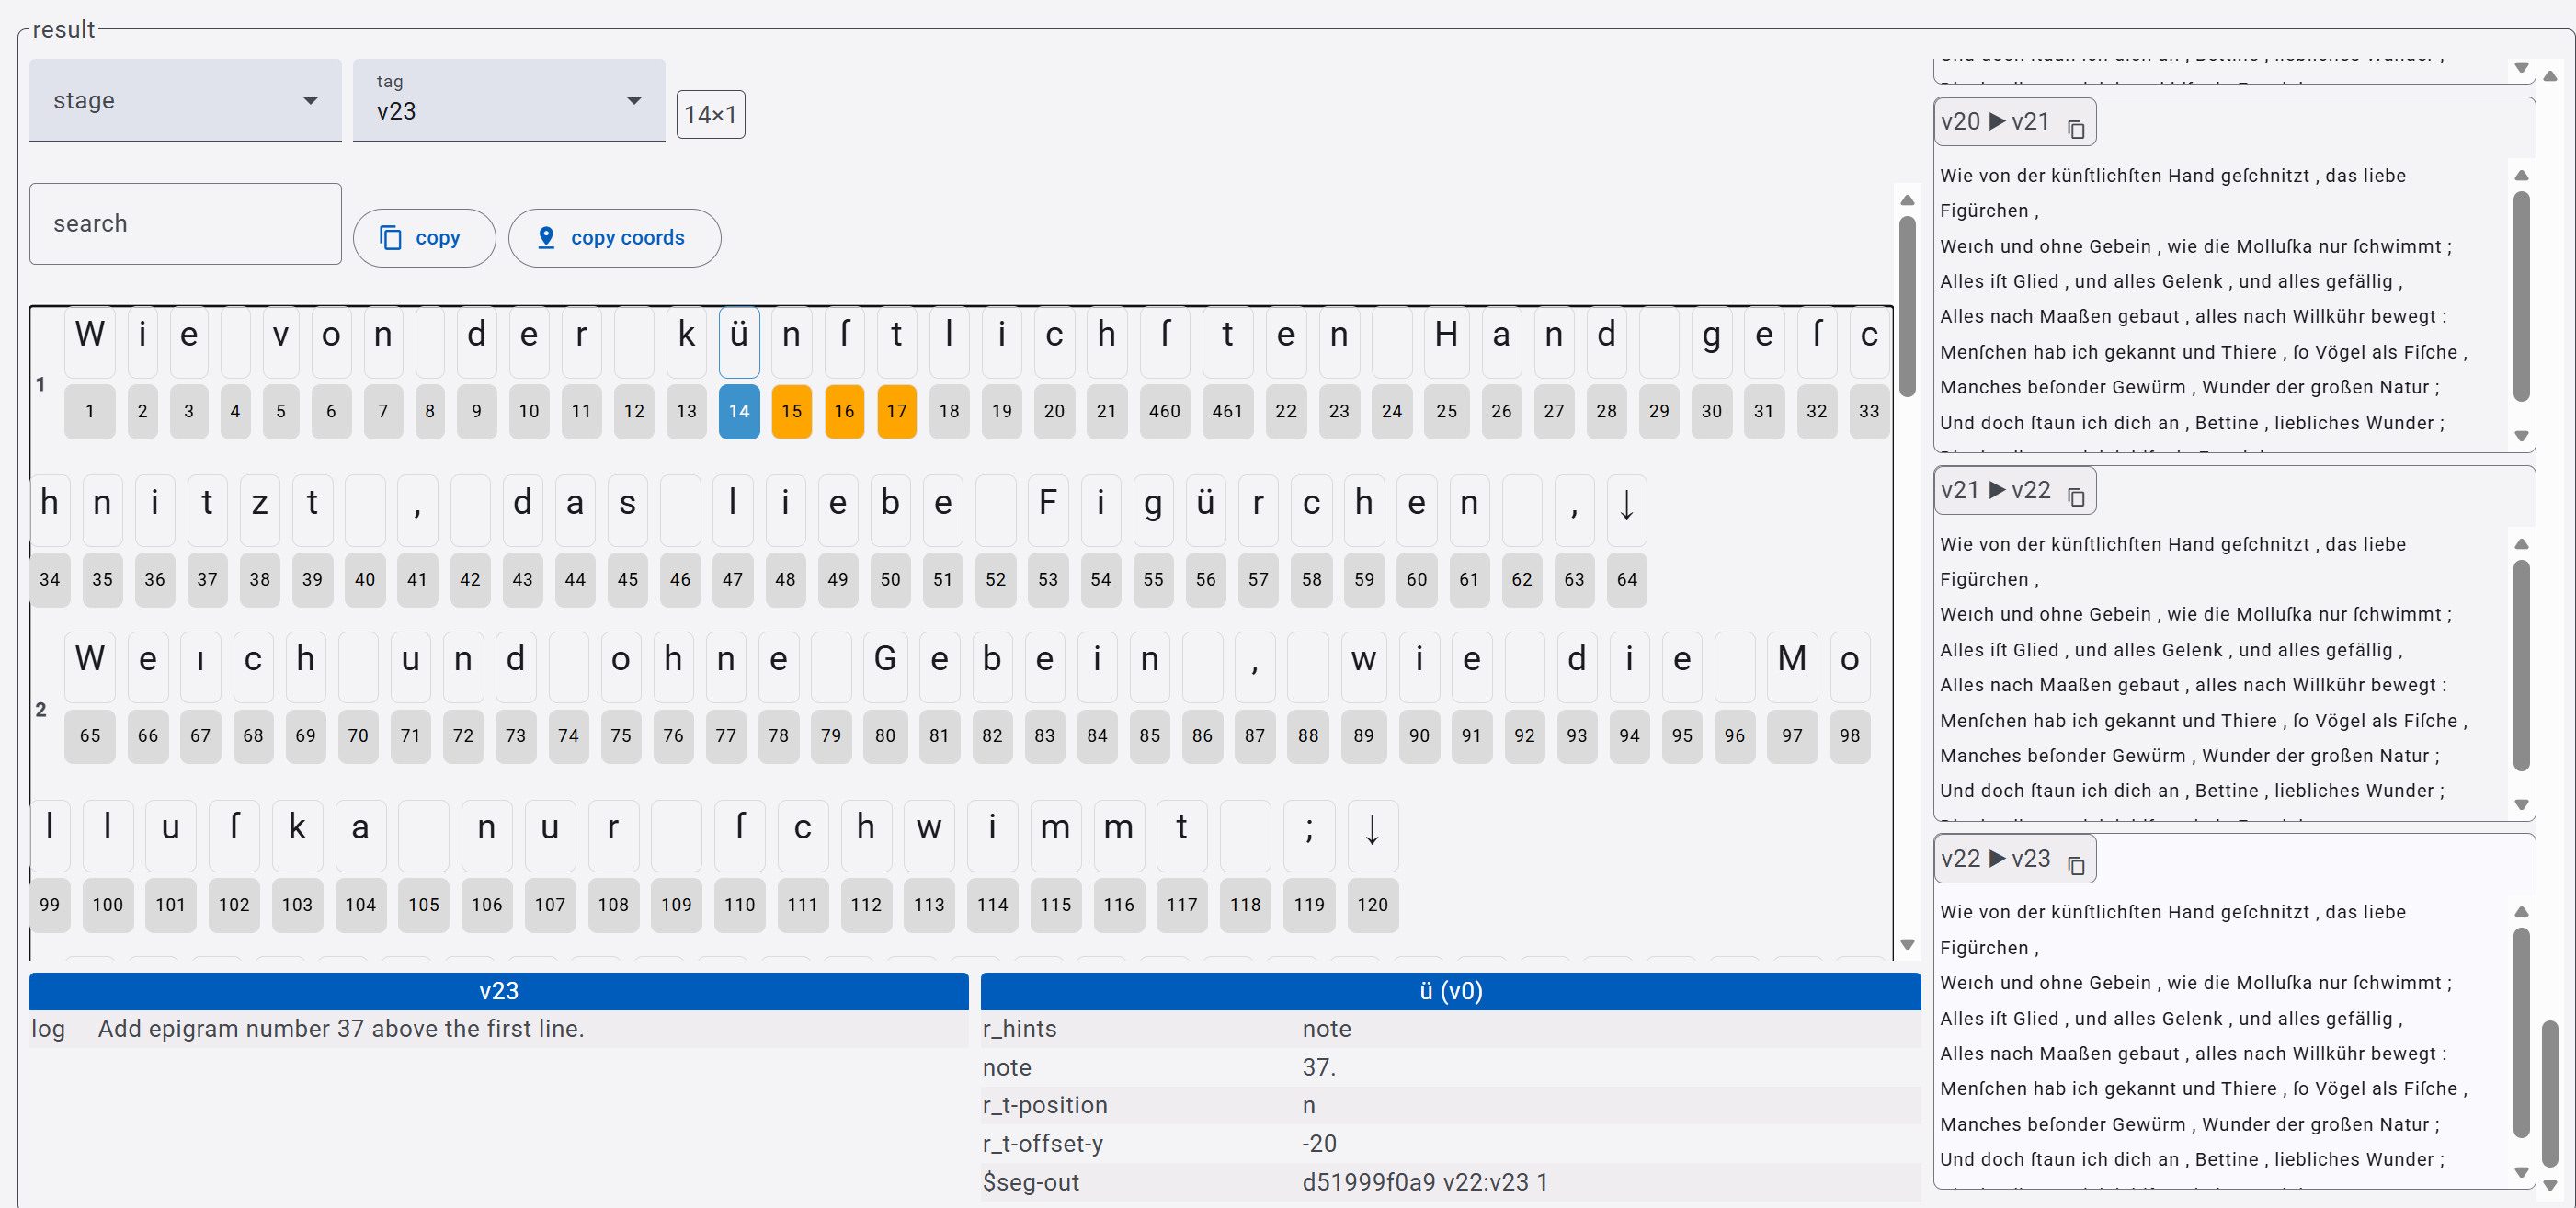
The result shows a “map” of all the alterations to the right:
- each alteration is labelled with the ID of its input and output texts. For instance,
v0 ▶ v1means that the input isv0(=the base text) and the output isv1. - click the small copy button next to this label to copy the corresponding output text.
- click the text to see its detail in the result pane. The detail works much like the base text view: it displays the text character by character, with all the features already described above. Additionally, you can inspect features attached to each alteration text and each character in it. When you click a character, at the bottom you will see (if present):
- at the left, all the global features attached to the text as a whole.
- at the right, all the features attached to the character you clicked.
In addition to the map, two dropdown controls at the top left of the results section can be used to:
- pick any given staged alteration from the list of all staged alterations. While each operation has its tagged output, only some of them are explicitly tagged by users as “staged”, i.e. representing a specific state of the text ideally reconstructed as a waypoint along the full transformation path.
- pick any tagged output from the list of all outputs. Each operation has its tagged output, progressively numbered after
v0(which is the base text):v1,v2, etc.
Operations Tab
This tab contains the list of the operations which transform the base text, in their execution order. In most cases this is a linear sequence, so that the output of each operation is the input of the next one.
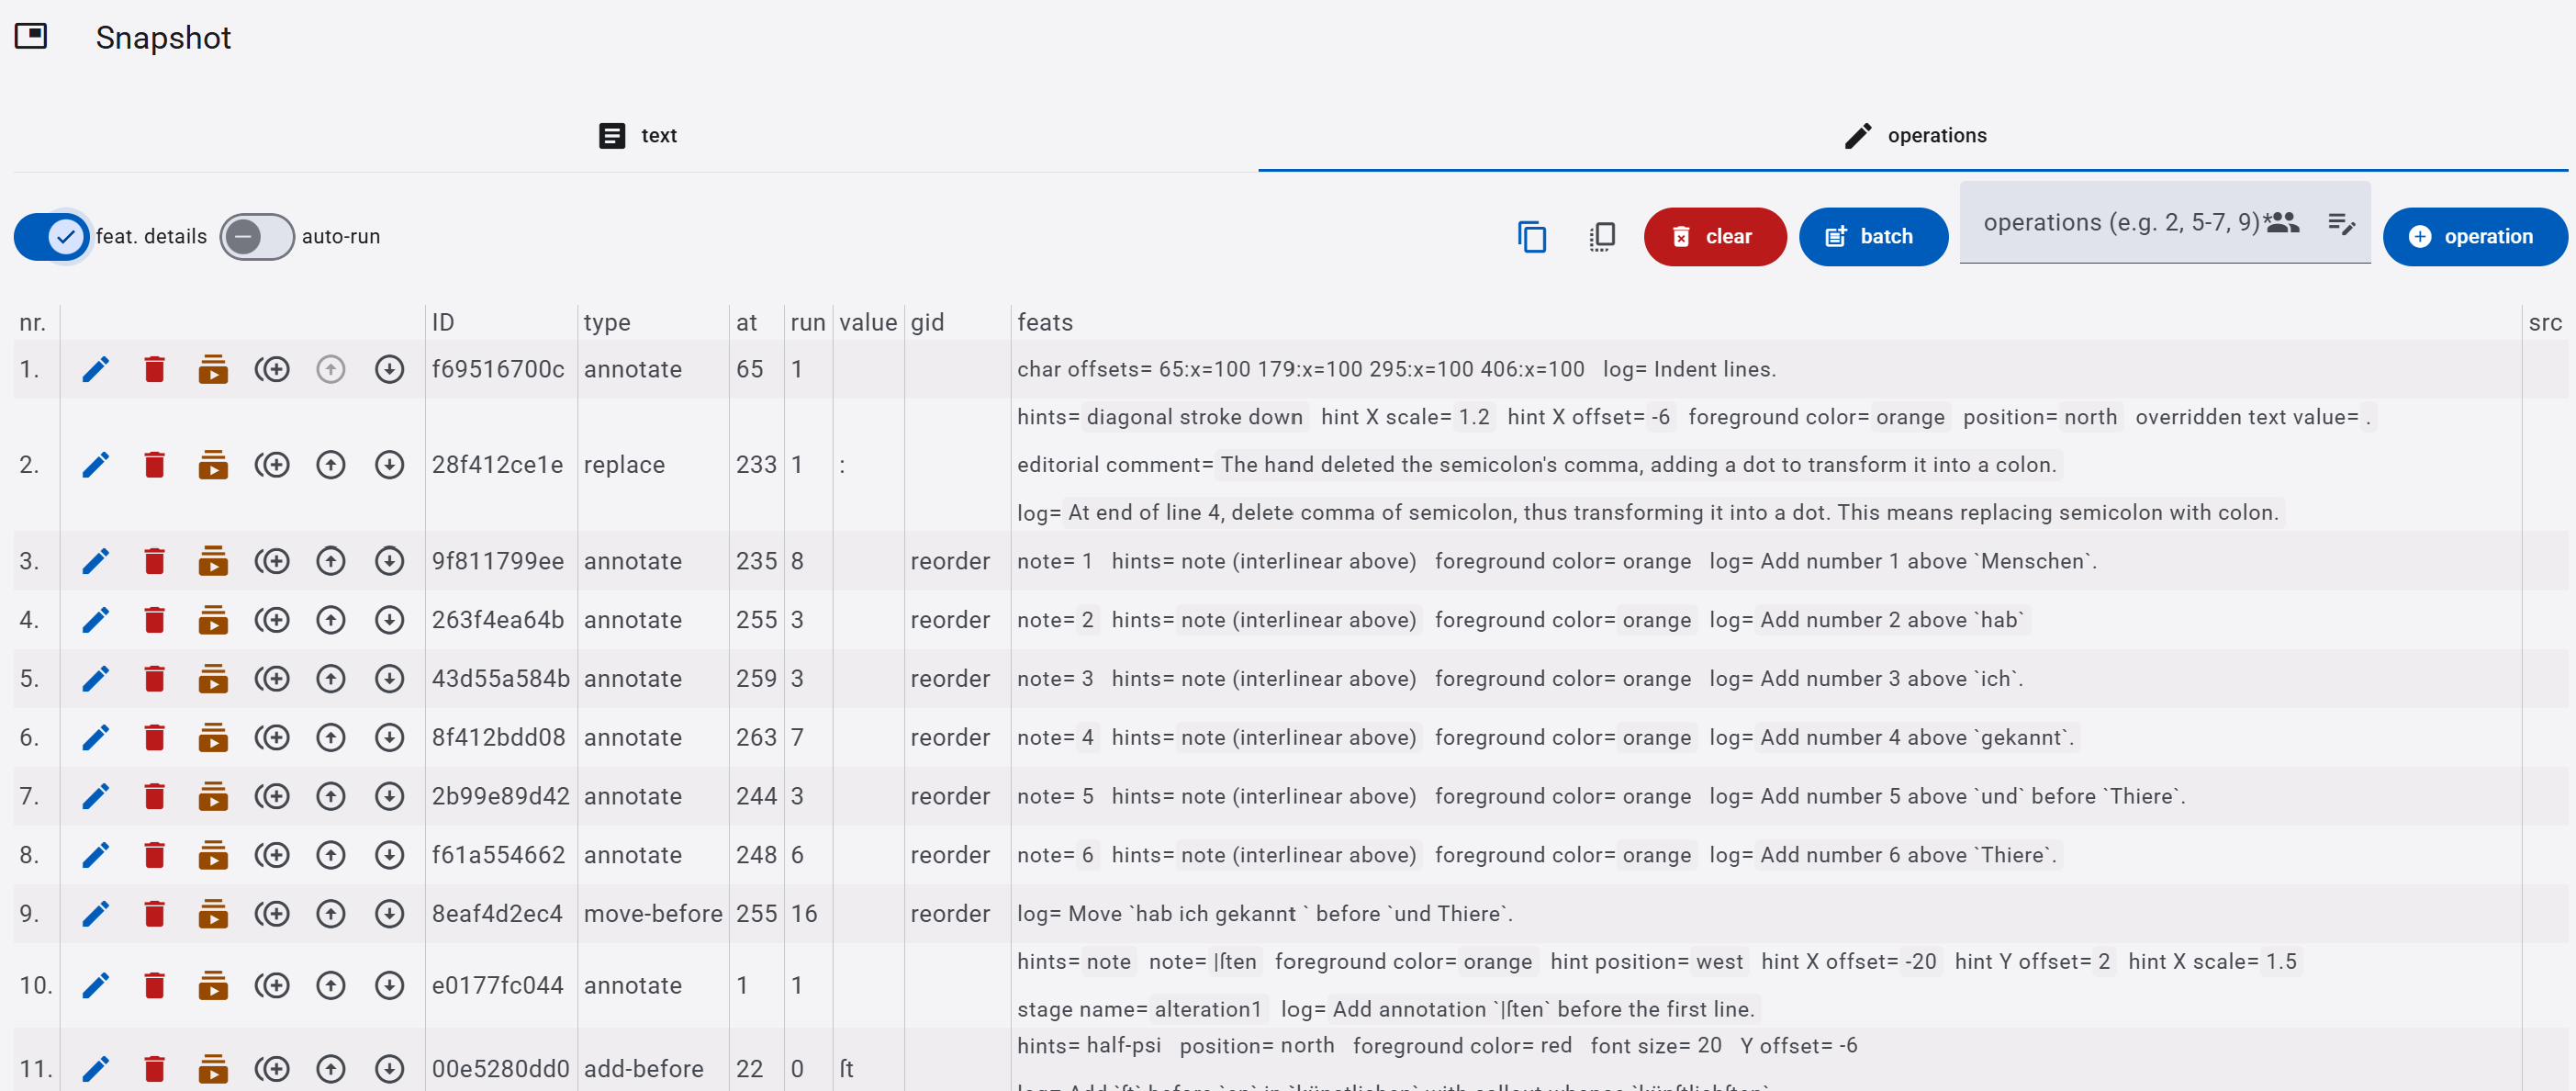
The top toolbar contains these controls (from left to right):
- feature details toggle: toggles the display of features details in the list of operations. This is useful to look at all operations with their features at a glance.
- autorun toggle: toggles autorun, which runs operations whenever you save a new one. This is rarely used though, as it might slow down your data entry flow.
- copy operations DSL: copies the DSL text representing all the operations entered in this snapshot, one per line. This uses a domain specific language (DSL) to represent operations and their metadata in a compact, plain-text form. You can also use this feature to clone all the operations at once into another snapshot (via the batch add button).
- copy snapshot raw data: copies the base text and its operation in a machine-ready JSON format. This is mostly used for advanced scenarios or diagnostic purposes.
- clear operations: clear all the operations (you will be prompted for confirmation).
- add a batch of operations: add multiple operations at once, from their DSL-based text representation.
- add features or sources to a subset of operations: often, you want to add a feature (like text color) or source (like hand) to a set of operations at once. To this end, you can use this box: just enter the range(s) of operations you target, separated by commas, like
2, 5-7, 9(=operations 2, 5, 6, 7, 9), and click either the pen-like button to add a feature, or the people-like button to add a source. A corresponding editor will open targeting all the selected operations (these will be highlighted in the list). - add a new operation: adds a single operation at the bottom of the list. You can then move it if needed.
Note that when adding features/sources to a set of operations, the edited features/sources are blindly added to the target operations, whether they already included them or not. This is because it is perfectly legal to have multiple sources or features, so it is often the user’s responsibility to determine this behavior. Thus, be sure you get the intended results when using this command. In most cases this does not pose issues, because this command is typically used when you want to populate a newly entered set of operations all at once with a given feature or source.
The list of operations includes one row per operation, with these columns:
- the operation’s position (1, 2, etc.). Note that this is not an identifier: if you reorder or delete operations, this number will change.
- actions buttons for the operation:
- edit
- delete
- run operations up to this operation
- clone operation
- move operation up
- move operation down
- the operation’s ID. This is a unique alphanumeric ID assigned by software to each operation.
- the operation’s type.
- the operation’s coordinates relative to the text it affects:
at: the coordinate to the first selected character.run: the number of characters to select starting fromat.
- the text value of the operation when it adds new text (i.e. it is a replace or add operation).
- the group ID (
gid) of the operation. This is an arbitrary human-friendly ID manually assigned by users to group logically connected operations together. - the operation’s features.
- the operation’s sources count. Hovering the mouse on the count will show the sources identifiers.
Editing Operation
When you click the pen button next to an operation or you add a new operation, the operation editor becomes visible.
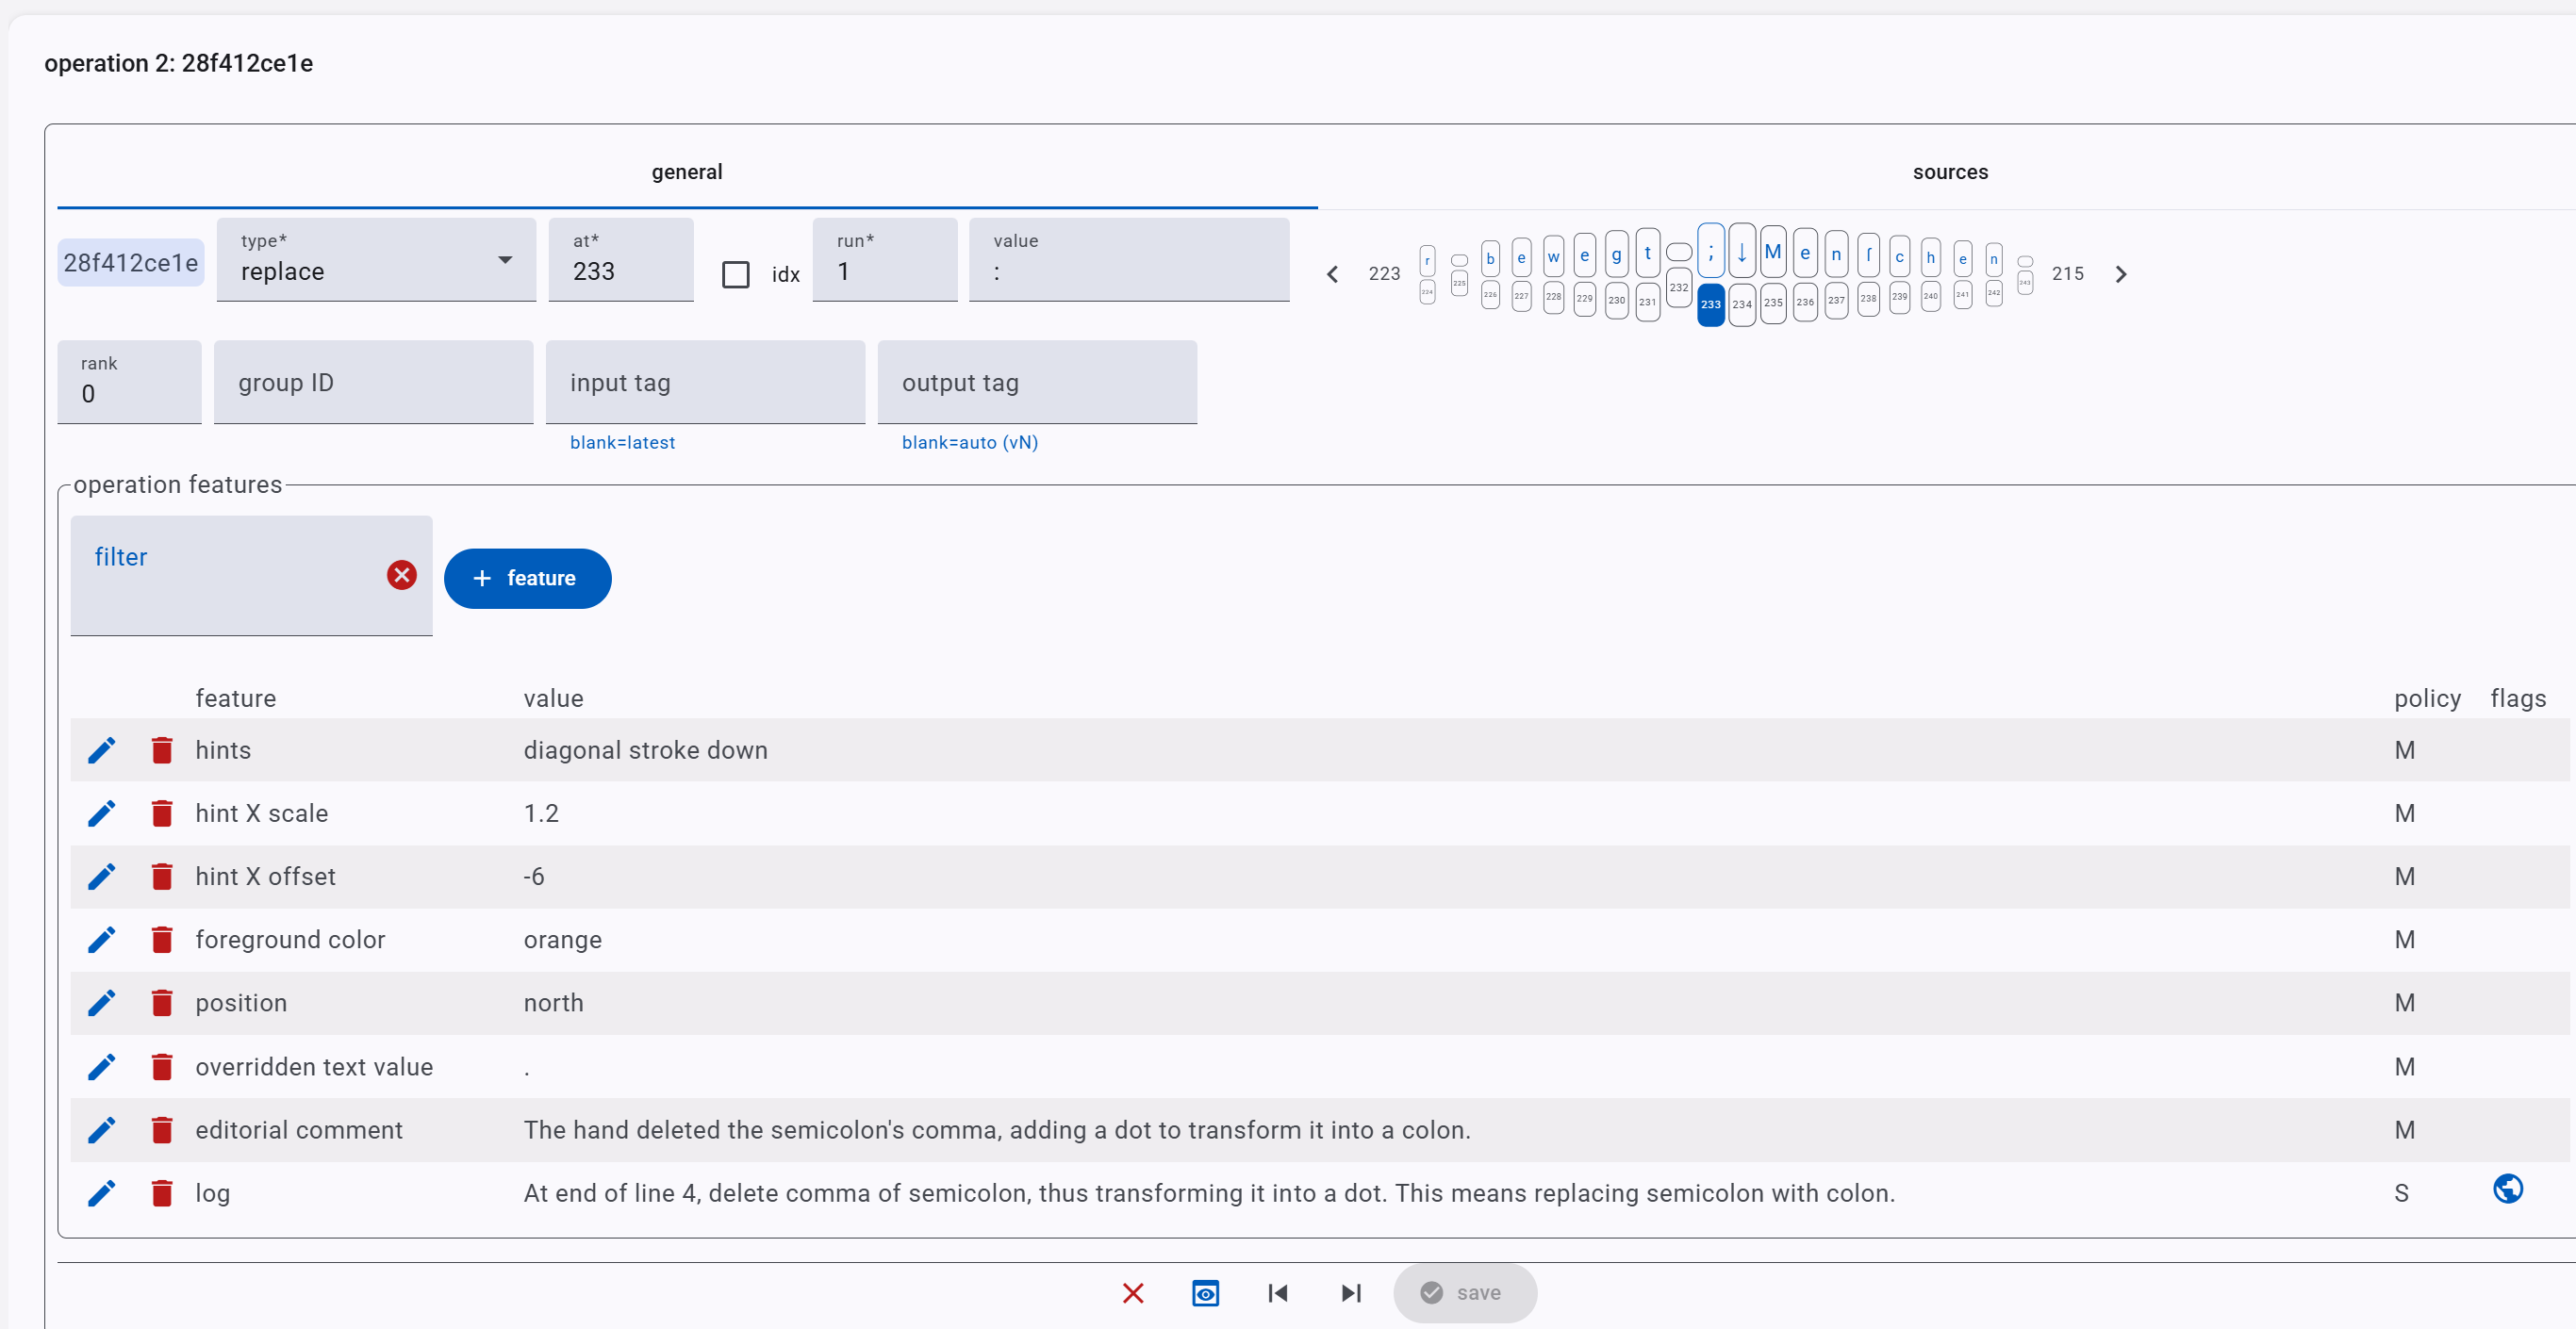
- ID: the operation’s ID is automatically generated and is not editable. It is displayed next to the type selector for your reference, even though it has almost no use while editing. A unique ID for each operation is anyway required to be able to deep link it or export the snapshot into other formats while preserving entities identity.
- type: select the operation’s type. This should be your first task, because the UI can change according to the type selected.
- at, run: these coordinates define the input of the operation. Move operations also add to, and swap operations add a to run too. In most cases the coordinates refer to character identifiers. So,
7x2means that we select the character with ID 7 and that with the subsequent ID 8. Note that nothing ensures that identifiers will be consecutive. This is very often the case, because the base text adds most of the characters once, and IDs are generated as a progressive number. So, in the base text (v0) effectively the first character has ID=1, the second has ID=2, and so forth. Yet, operations can disrupt this order, by deleting, inserting or moving characters. So, you must not assume that IDs are progressive; just pick them by inspecting the base text or the result of the operation before the one you are editing. If you need to select a span of characters having non-progressive IDs, check theidx(=index) option to use a 0-based index instead of an ID. In this case, a coordinate like7x2no longer means IDs 7 and 8, but characters at index 7 and 8, whatever their IDs. Note that the index is 0-based, meaning that the first character is 0, the second is 1, and so forth. - value: here you enter the text value for those operations which introduce new text. These are replace and add operations. So, to replace characters with ID 7 and 8 with a new character “X” you use a replace operation with coordinates 7x2 and value=
X.
Note that all characters which get added are assigned a new ID, always following the progressive numbering rule. So, if your base text has 100 characters it will start with IDs 1 to 100; if you then add “abc”, the characters will be assigned IDs 101, 102, and 103. In this model every added character gets its own unique ID and retains it forever, as it continues to be present in the chain structure even when deleted or replaced. So, even if you delete a character and later re-add it in the same position, the new character is not the same of the original one, and will thus be assigned a new ID. This is consistent with a model typically representing a sheet of paper where once you write something it stays there forever; you can cross it out, overwrite it, or use any other signs meant to efface it, but nonetheless it stays on this sheet even when it is no longer meant to be part of the text.
- peep window: this control is displayed at the right of the coordinates, and shows a “window” listing the text characters being selected by them. Whenever you change the coordinates, the window is updated automatically. You can drag the window to look at the characters before or after it, or use the buttons at its left and right edges for the same purpose. The numbers next to these buttons show the count of characters before and after the visible window. If your operation is using option
at as index, the peep window will show indexes instead of identifiers. - rank: this numeric value represents the level of certainty you assign to the edited operation. Usually it is 0, meaning you do not care about it. You can set any positive value starting from 1, according to your convention, representing the certainty rank: 1=sure, 2=probable, 3=dubious, etc.
- group ID: usually empty, unless you want to virtually group multiple operations together because they are somewhat logically connected. For instance, if a hand adds 3 numbers over 3 words to mean that they are to be reordered following these numbers, this is represented with 4 operations: 3 annotation operations for assigning numbers, plus a final move operation to effectively reorder these words. In this case these operations are clearly grouped into a single logical unit, so you can assign them the same group ID, which is just a human-friendly conventional string, like
reorder. - input and output tags: these are rarely used, and in most cases are left empty. Usually operations are meant to be executed in a linear way, from the first to the last, so that the output of each operation is the input of the next one. So,
v0is the input of the first operation, which outputsv1;v1is the input of the second operation, which outputsv2; and so forth. In some very complex reconstructions, you might want to “branch” this sequence of transformations so that multiple parallel changes stem from the same input, each following its own line. In this case you would specify the input tag here. Output tag is never specified, but it is there for completeness and for very peculiar scenarios which are outside the scope of this introduction.
Operation Features
Operations change or annotate text. Each operation can get metadata from an extensible set of so-called features. A feature is a name=value pair linked to an operation. Features not only encode metadata related to the interpretation and annotation of the text, but also represent their visual layer, when you want a symbolic reproduction of it too.
Operation features are listed under the corresponding panel in the operation editor (with an optional name filter to filter the list), including:
- name;
- value;
- set policy (which determines the injection behavior of the feature into the output generated by the operation);
- flags (negated, short-lived, global), each represented by an icon.
See the documentation about the snapshot model operations for an explanation of these additional metadata attached to each feature.
- to add a new feature, click the
+featurebutton; - to edit a feature, click its pen button;
- to remove a feature, click its trash button.
When you edit a feature, you typically specify name and value. Typically the name is picked from a closed list, specific to each project; the value is either free or picked from a list, according to the name.

Some features when selected can get multiple values, like the hint feature shown here. In this case:
- if the values are from a closed list, a new selector appears (the one with label “select value”); pick the value and click the
+button to add it to the composite value textbox. There, each value is separated by a space. -
for hints, you can have a prefix to target only one of the hint in the target value. By default, hint features apply to all hints selected, unless the property value starts with
@followed by a space-delimited list of targets, ended by:; in this case, it applies only to those hints matching the list. Targets can be: - hint key strings: applies to all hints with that key. E.g.,
@alpha beta:eapplies to all hints with keyalphaorbeta. - 1-based ordinal numbers: applies to the hint at that position in
r_hints. E.g.,@1:eapplies only to the first hint, even if multiple hints share the same key. - mixed:
@1 beta:eapplies to the first hint (by position) and all hints with keybeta.
When multiple targets match the same hint, ordinal-based overrides take precedence over key-based overrides, which take precedence over the wildcard (no
@prefix).
Also, when picking a name flags are automatically set according to the nature of the selected feature. You can always override them if required, but usually this is not the case, and this automatic setting makes the edit easier and less error-prone.
Visualizing Operations
In most cases, your operations not only encode text changes, but also provide a symbolic representation of their visual appearance in the document. This visualization leverages a complex, interactive rendition which uses time to add a third dimension in the representation of such evolving texts.
The editor embeds the viewer control to show this visualization whenever you want to check the result of your operations in its full evolution.
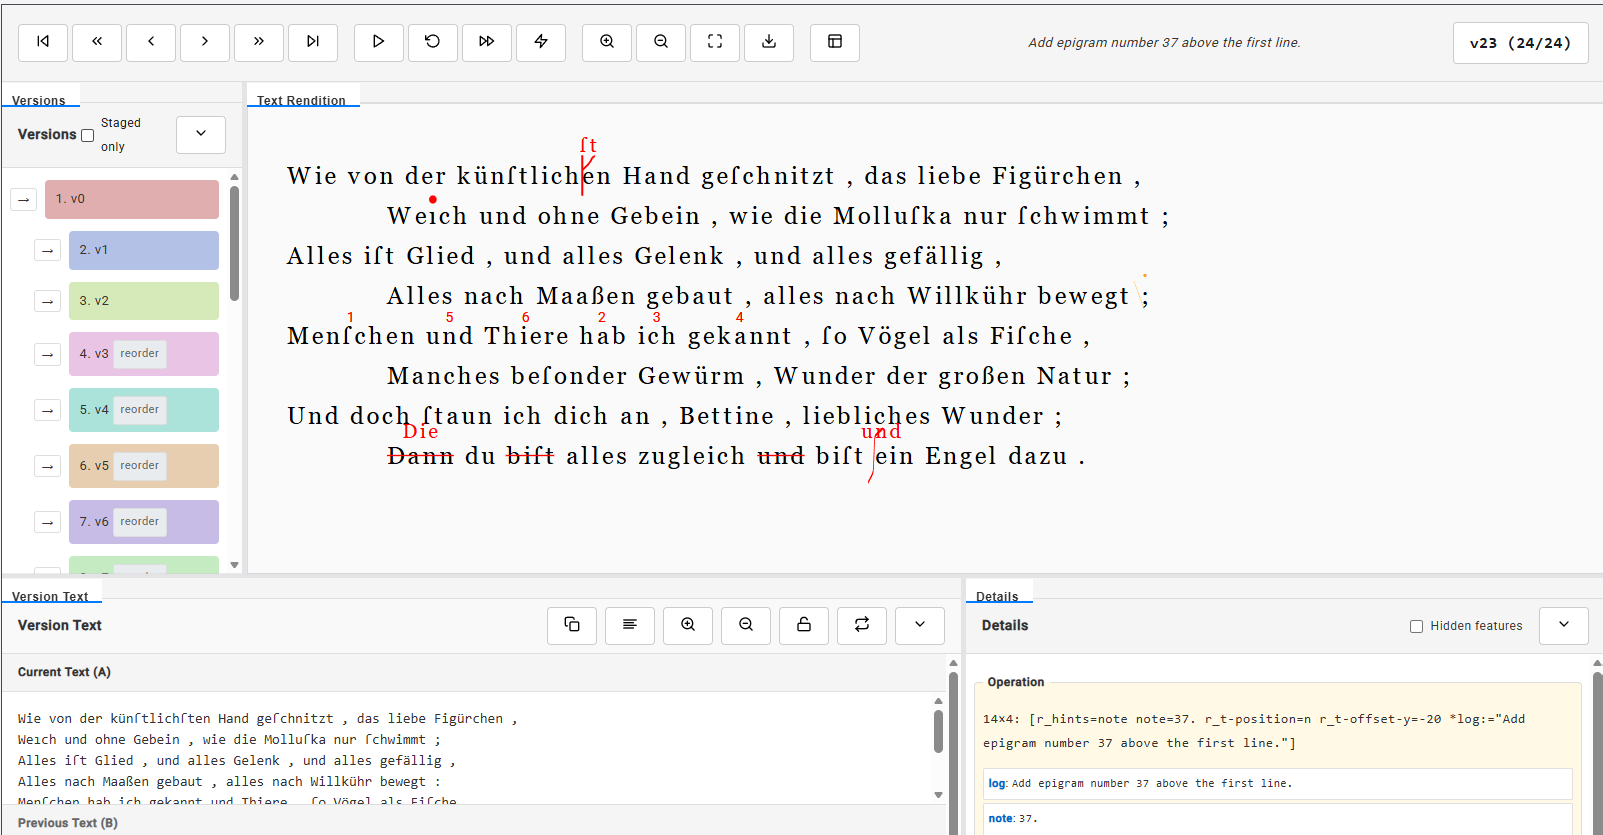
The renderer gets its data updated whenever you run operations or you save the snapshot. Once updated, you can inspect the result by clicking its play button in the top toolbar, or just advance one operation at a time (forward or backward) with the other navigation buttons.
In short, the renderer provides these sections:
- top toolbar: from left to right:
- navigation buttons: first operation, previous staged version, previous version, next version, next staged version, last version;
- play: click to see the whole transformation advancing automatically;
- reverse: toggle to invert the time direction;
- auto-forward on group: toggle to keep moving to the next operation until it belongs to the same group;
- compressed time: toggle to compress the transformation play time by zeroing animations time;
- zoom in, zoom out, fit to view;
- download SVG: download the current rendition as an SVG image;
- reset layout: reset the renderer layout after you have variously resized its panels.
- log display: this displays the value of the log feature when present. The log feature is typically present in each operation and it shortly summarizes what it does. This is suggested to direct users attention to the operations as they are played and quickly explain their purpose.
- alteration tags (current tag, alteration ordinal number, and total number of alterations).
-
versions panel: the list of all the alterations tags. Each has a color, an ordinal number, a tag, and a group ID when present. If you click the colored part all the visuals belonging to it are highlighted with its color. If you click the arrow button you jump to that alteration. If you toggle staged only you will see only staged versions.
- version text: the current text (A), the previous one (B, when different from A), and the differences between them. Its toolbar contains these buttons (from left to right):
- copy text;
- toggle word wrap;
- increase or decrease font size;
- pin previous text (B): this “pins” the previous text to the currently displayed one so that until you do not unpin it the A text will be always compared to the pinned B text.
- details: the details of the last run operation and those of the character you hover on with the mouse. Use this to quickly inspect features injected by operations to annotate their output text.
You can drag the rendition to pan it and use the mouse wheel to zoom in and out (in addition to the zoom buttons).
⚠️ Always remember to carefully distinguish between characters which are or become part of the text and those which represent other signs which do not represent the text you are encoding. For instance, a number or a letter added on top of an epigram’s text to order it in a collection is not strictly part of the text, even if it visually is text (digits or letters). If instead you add a letter to a word in the epigram’s text, this is a change in the text, and as for all such changes it must be encoded with an operation different from annotate.
The annotate type is the only operation type which does NOT alter the text. All other operations generate a different text as their output. So, always remember this rule when selecting the operations’ type: if it does not change the text, then it’s an annotate operation, whatever its visual appearance (including text); if instead it does change the text, even in the slightest possible way, it must not be an annotate operation.